Red bricks are used widely in daily life, from houses to gardens. Also known as clay bricks, they are a type of fired brick. This article explains how red bricks are made and the common problems in production, hoping to help your business.
Production Process
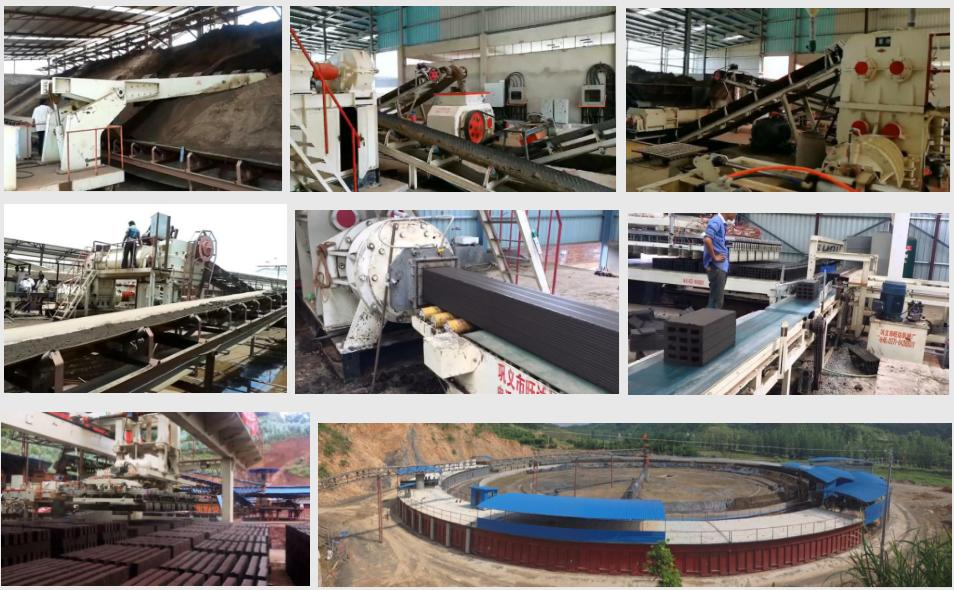
Raw Material Selection
Red bricks are made from raw materials such as clay, shale, and coal gangue.
Raw Material Processing
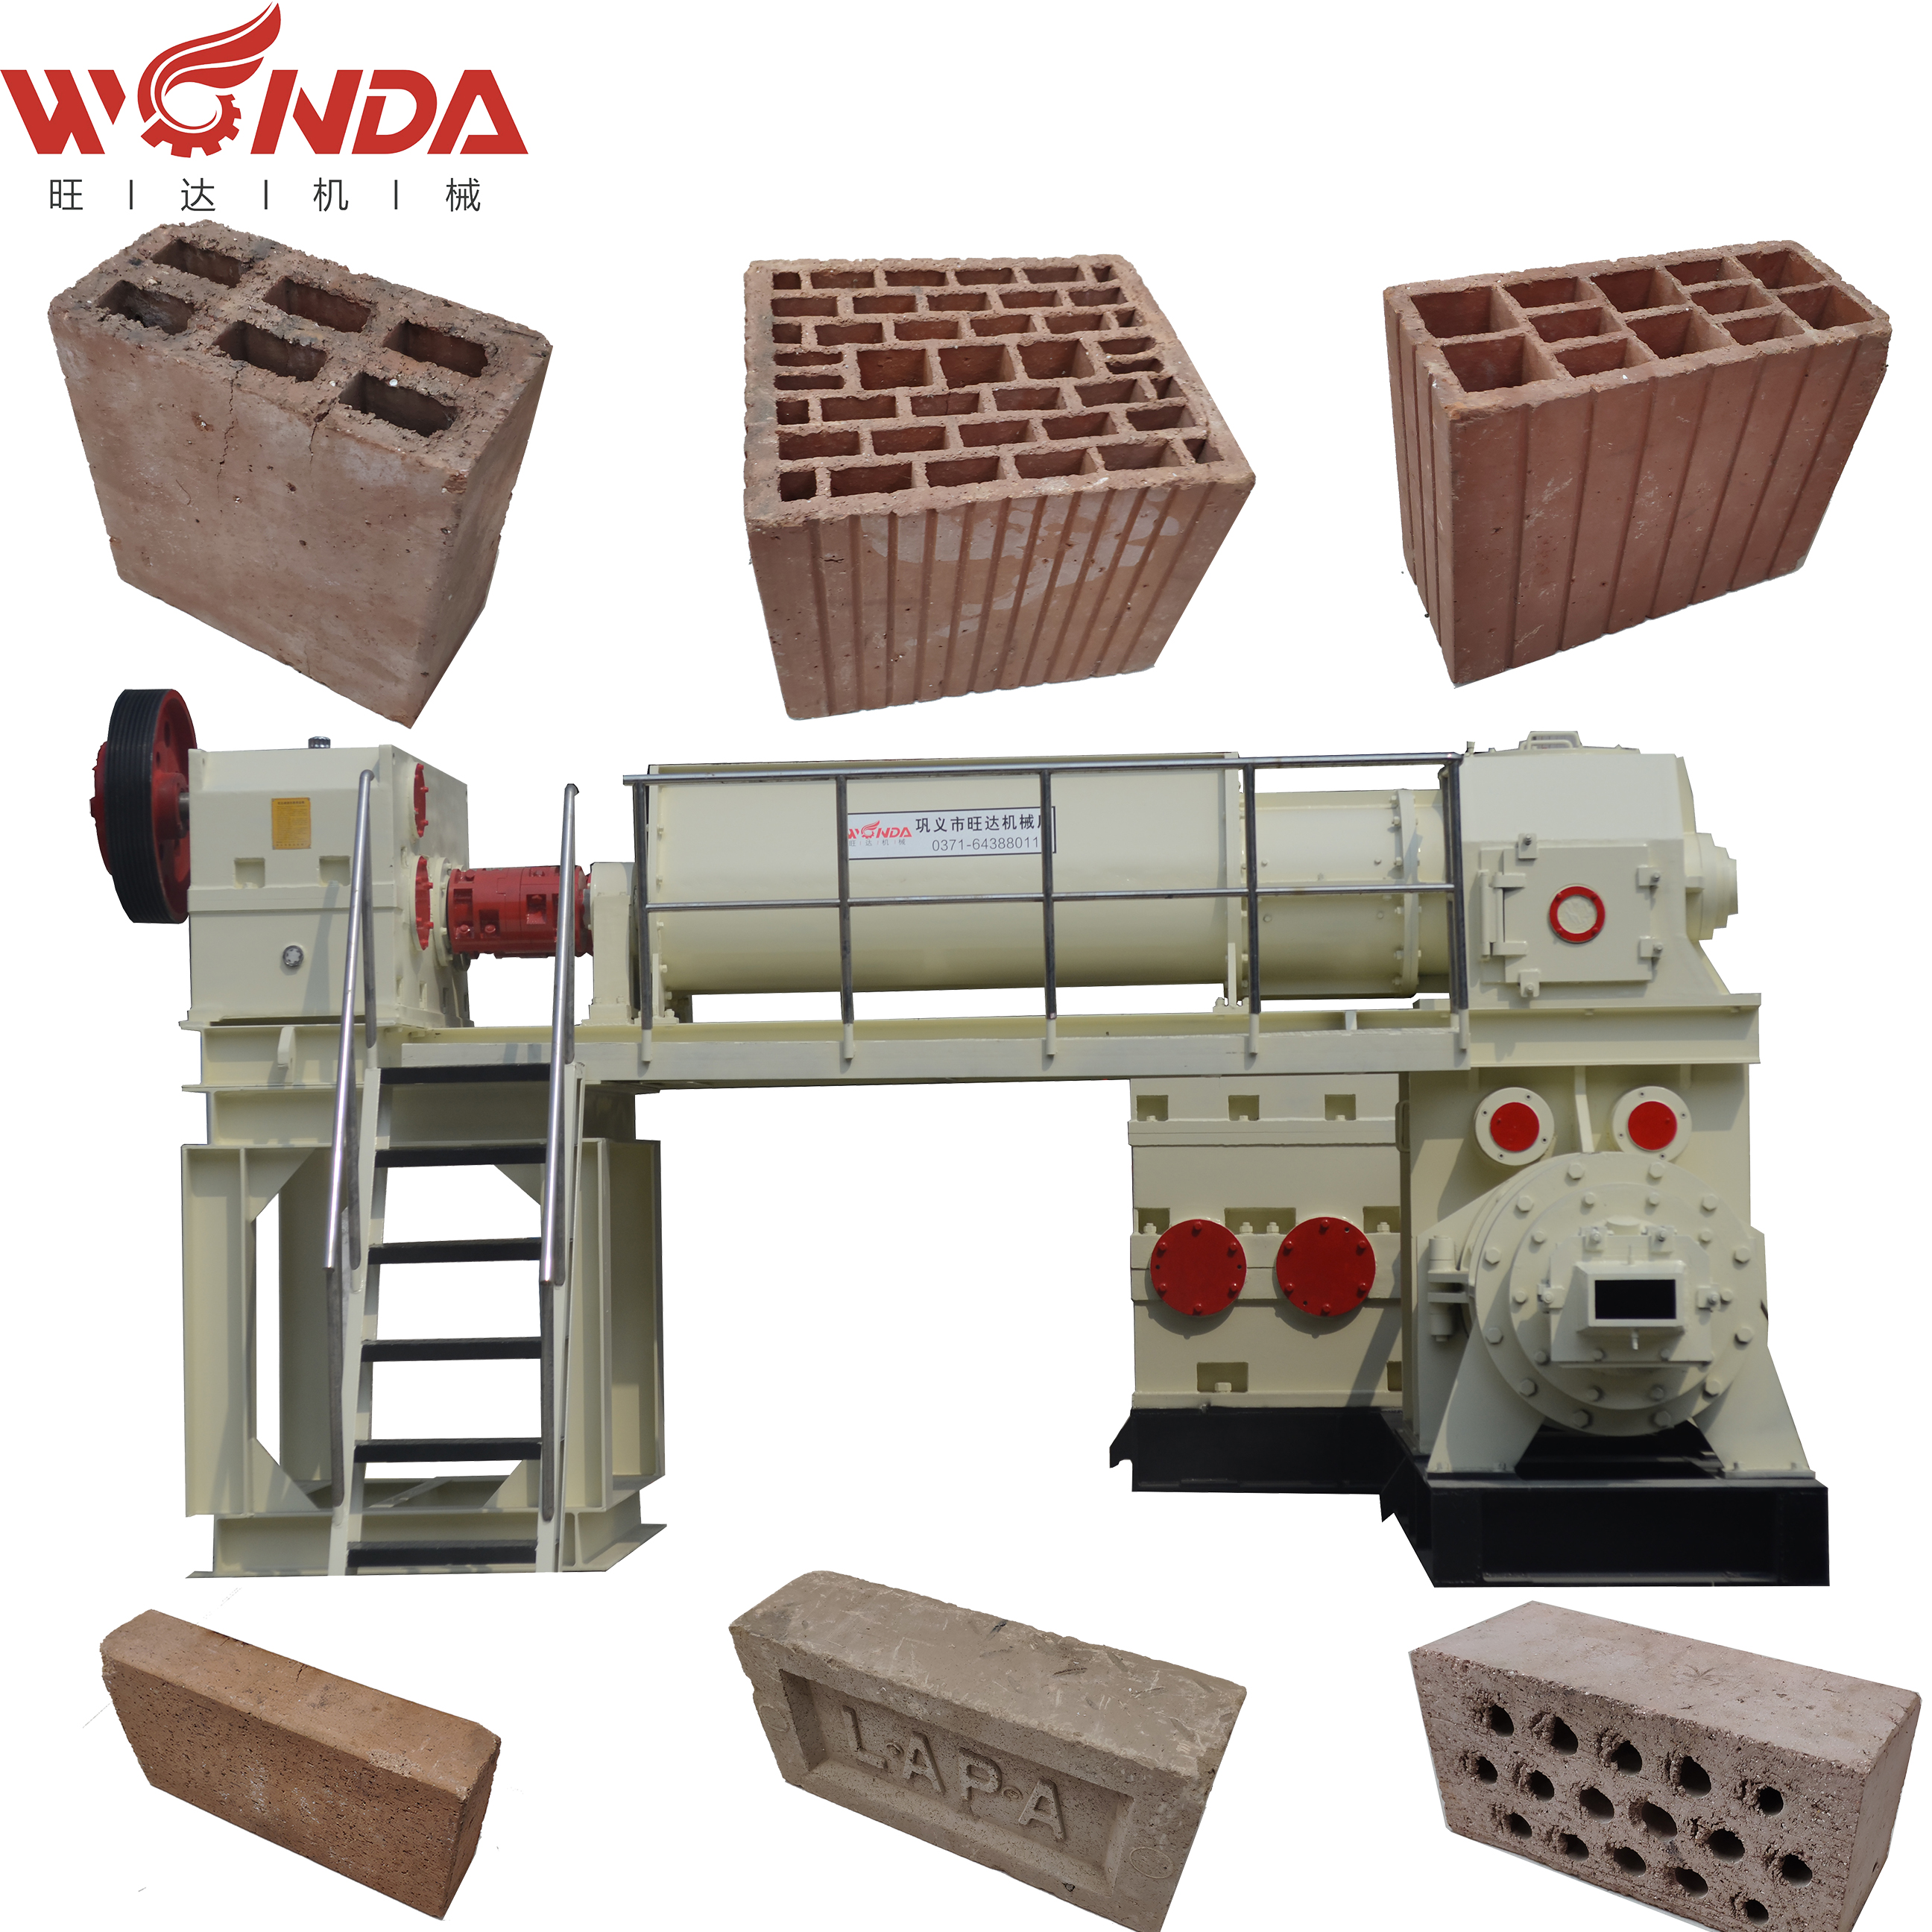
A brick raw material crusher first crushes the raw materials, then mixed with water in a pug mill to form a thick, paste-like mixture. This paste is fed into a brick extruder, which produces a smooth-surfaced clay column. The clay column is then cut into shorter sections by a brick strip cutter, and finally, a wire-cut brick-making machine further divides these sections into raw bricks of standard and uniform size.
Drying
The freshly formed raw bricks are stacked in order and then dried either in a brick dryer or through natural sunlight and air. As the moisture evaporates and the water content drops below 6%, the drying process is complete.
Kiln Loading and Firing
The dried raw bricks are neatly stacked onto kiln cars or into the brick kiln chamber according to specific patterns and densities, ready for firing. The bricks are fired at high temperatures ranging from 800°C to 1,100°C in the kiln (typically around 900°C). Firing is a critical step in brickmaking—proper temperature control directly affects the quality of the finished bricks. For example, low-temperature firing is used to remove any remaining moisture from the raw bricks slowly. If the heat is turned up too quickly while moisture is still present, the bricks will crack.

Cooling and Unloading
After firing, the bricks must be cooled. Once they reach a temperature that is not too hot to touch (about 60°C), they can be unloaded from the kiln by machine or by hand. The cooling process should not be too rapid; otherwise, cracks will form inside the bricks, causing them to break easily when handled.
Inspection and Stacking
Professional workers carry out a series of inspections on the bricks and remove any that do not meet the standards. Only the bricks that pass the inspection are stacked outside the kiln, ready for delivery.
Previous sections have introduced the standard production process of red bricks. Below, common quality defects, their causes, and solutions are listed by production stage for you to check and troubleshoot.
Causes and Solutions
Raw Material Stage
White efflorescence on the brick surface (efflorescence)
Appearance: The brick surface looks like it has a layer of white frost after drying.
Cause: Excessive soluble salts in the raw materials.
Solution: Replace with low-salt raw materials and control the forming water content within a specific range.
Weak bricks that break easily
Appearance: Low brick strength and poor compressive resistance.
Cause: Poor plasticity of the raw materials or excessively high sand content.
Solution: Adjust the raw material mix by adding more clay with higher viscosity.
Limestone particles found inside bricks, causing bursting when exposed to water
Appearance: After construction or rain exposure, the brick surface swells or even spalls off.
Cause: Limestone in the raw materials was not fully crushed, leaving particles too large.
Solution: Improve crushing, use more stone-removing equipment, and extend the aging time of the raw materials.
Forming Stage
Inconsistent brick dimensions
Appearance: Bricks from the same batch vary in size and thickness, causing uneven gaps when laying walls.
Cause: The cutting wire on the wire-cut brick-making machine is loose or worn, or the cutting speed is uneven.
Solution: Tighten or replace the cutting wire, adjust the cutting speed, and check the synchronisation of the wire-cut brick-making machine.
Burrs or trailing edges on raw bricks
Appearance: The edges of the raw bricks are uneven, with excess material trailing out due to improper handling.
Cause: The cutting wire on the wire cut brick making machine is worn or not properly tensioned, or the cutting table is uneven.
Solution: Replace or adjust the tension of the cutting wire, and level the cutting table.
Layering or spiral patterns inside raw bricks
Appearance: When broken open, the raw brick shows internal layering or spiral-like patterns.
Cause: Insufficient vacuum level, meaning air in the clay mixture was not fully removed, leaving voids inside the brick.
Solution: Check the vacuum pump and control the moisture content of the clay mixture.
Drying Stage
Fine cracks on the surface of dried raw bricks
Appearance: Before entering the kiln, the raw brick already has hairline cracks on its surface.
Cause: The raw bricks dried too quickly, leading to uneven moisture evaporation.
Solution: Control the temperature, increase humidity, and extend the drying time.
The following detailed explanations cover two drying methods: natural drying and artificial drying.
Natural Drying
Follow the principle of “shade first, sun later”: As the name suggests, first dry the raw bricks in a shaded or sheltered area for 1–2 days to allow some moisture to evaporate, then move them outdoors.
Leave gaps between raw bricks using “vertical stacking” or “diagonal stacking”: Leave about 2–3 cm between bricks to allow air circulation. If the bricks are stacked too densely, the surface will dry while the inside remains wet, making the bricks prone to cracking.
Avoid direct sunlight on the bricks: Use shade netting, and leave a gap of 20–30 cm between the netting and the bricks.
Turn the bricks regularly: Turn them once a day in the beginning, and you may reduce the frequency later as needed.
Artificial Drying
Use a step-by-step temperature increase.
Control the direction of the incoming air.
Add appropriate moisture to the bricks.
Kiln Loading and Firing Stage
Underfired bricks
Appearance: Lighter color than normal.
Cause: Firing temperature is too low, or insulation is inadequate.
Solution: Moderately increase the firing temperature, extend the firing time, and regularly check the temperature inside the kiln.
Overfired bricks
Appearance: Darker color than normal.
Cause: Firing temperature is too high, or the bricks are kept at high temperature for too long.
Solution: Control the maximum firing temperature, shorten the firing time, and regularly check the temperature inside the kiln.
Cooling and Unloading Stage
Chipping when handling bricks after cooling
Appearance: The bricks chip or break into pieces when touched during handling.
Cause: The bricks were unloaded from the kiln before they were fully cooled.
Solution: Make sure the brick temperature drops below 100°C before unloading them from the kiln.
Dull-sounding bricks
Appearance: When tapped, the brick produces a dull, unclear sound instead of a crisp one.
Cause: The cooling process was too rapid, with insufficient time for gradual temperature reduction.
Solution: Lower the temperature slowly; do not cool too suddenly or too quickly.
Inspection and Stacking Stage
Damage to finished bricks due to improper stacking
Appearance: The bricks look fine when unloaded from the kiln, but develop chipped corners or cracks after being stacked for some time.
Cause: Unstable stacking, excessively high stacks, or rough handling during transport and storage.
Solution: Standardize the stacking height and method, and handle bricks gently.
FAQ
Q: What kind of soil is used to make red bricks?
A: Mainly clay, but other materials such as shale, coal gangue, and fly ash can also be used.
Q: Why do my red bricks look different from the pictures? Some are yellowish, while others are blackish.
A: There are two main reasons. First, the iron content in the raw materials varies, and the degree of raw material processing differs. Second, oxygen deficiency occurred during firing. Regarding raw materials, too much limestone or improper processing leading to excessive organic matter content can cause the bricks to turn black. Regarding firing, if there is a lack of oxygen during the process, the bricks will also turn black.
Q: What happens to red bricks when they get wet?
A: Red bricks will absorb some moisture, but prolonged exposure to water will damage them. This is why a layer of cement mortar is typically applied to the surface of red bricks to protect them.
Q: What is the best way to store red bricks?
A: Arrange them on a flat, well-drained surface. You can cover them with a waterproof tarp, leaving some gaps underneath, to prevent moisture absorption, which can reduce their strength and make them less durable.
Q: Can I repair a brick-making machine myself if it malfunctions?
A: It is best to first contact the manufacturer or a technical specialist for advice and follow their recommendations.
Conclusion
The above covers the complete process of making red bricks, from raw materials to finished products, as well as the most common quality problems at each stage and their solutions. We hope this article provides useful help for your procurement or production.
Post time: Jun-17-2026